How to Use Acrylic Sealant? Application Guide
Acrylic sealant is a flexible and paintable filler material frequently used in construction and renovation work. However, if not applied correctly, it may not perform as expected and cracks or voids may form on the surface. Therefore, there are some basic rules to follow when applying acrylic sealant. In this guide, we explain step-by-step how to use acrylic sealant, what preparations should be made, and what to pay attention to during application.
1. Surface Preparation
The most important step in applying acrylic sealant is surface preparation. The application area must be clean, dry, and free of dust. Old filler materials, dirt, oil, and loose particles must be removed. Otherwise, the sealant will not adhere well to the surface and will eventually peel off.
A suitable brush or cloth can be used to clean the surface. If necessary, light sanding can be applied to roughen the surface. Application on damp or wet surfaces is not recommended.
2. Material Selection Before Application
There are various acrylic sealant products on the market with different properties. It's important to choose the right product considering factors like indoor or outdoor use, paintability, and drying time. Additionally, having the appropriate tools, such as a spatula or spray gun, will make the job easier.
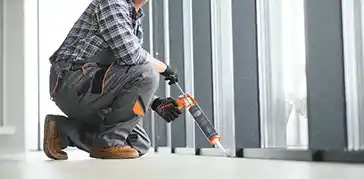
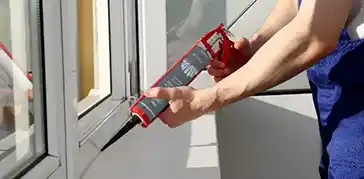
3. How to Apply Acrylic Sealant?
Acrylic sealant is usually sold in cartridges and applied with special guns. A nozzle of the appropriate diameter is attached to the end of the cartridge, and the sealant is dispensed by pressing at the correct angle to the area to be treated.
After applying the sealant, especially in wide joints or gaps, the surface is smoothed using a spatula or your fingers. This process ensures better adhesion of the sealant to the surface and provides an aesthetically pleasing appearance.
During application, ambient temperature and humidity are also important. Very cold or very humid weather can prolong the drying time of the sealant.
4. Institution Period and Post-Institutional Procedures
Acrylic sealant forms a film layer on the surface after application, and the complete drying time is usually 24 hours. However, this time may be longer for thicker applications. Once drying is complete, the sealant is ready to be painted over.
When painting, the type of paint used must be compatible with acrylic sealant. Water-based paints are generally suitable, but solvent-based paints may cause problems on the surface.
5. Common Mistakes and Their Solutions
- Poor surface cleanliness: Adhesion problems occur. Cleaning is essential.
- Applying the sealant too thickly: Drying time is longer, and cracks may form.
- Incorrect material selection: Using exterior sealant indoors will cause problems.
- Application in a humid environment: It will be inadequate for the institution and performance will decrease.
6. What jobs can be done with acrylic sealant?
Acrylic sealant is used in drywall joints, around doors and windows, and to fill small cracks and gaps. It is also preferred for decorative purposes in interior spaces due to its paintable nature.
Conclusion
When applied correctly, acrylic sealant provides long-lasting and aesthetically pleasing results. Attention must be paid to every stage, from surface preparation to drying time. By following this guide, you can get the best results from your acrylic sealant.
This article is for those seeking answers to the question, "How to use acrylic sealant?". Please note that the information in this article may vary depending on the manufacturer. Always check the product label.